
Serial- & Batchnumber Printing
This user manual provides detailed instructions on how to print labels with serial/batch numbers for specific scanned items in various transactional scenarios. The supported scenarios include GRPO, PICK, Stock Goods Receipt, Return, Goods Return, Stock Transfer, and Stock Counting.
Label Printing Process
Selecting a Scanned Item:
Navigate to the item list in the desired scenario.
Choose the scanned item for label printing.
Printing for Specific Scanned Item:
Click on the "Print" button associated with the selected item.
If the item has serial or batch numbers, a list of scanned numbers appears.
Select one specific number or choose to print all numbers for the item.
Printing for All Items:
Alternatively, in the menu, locate and select "Print all labels."
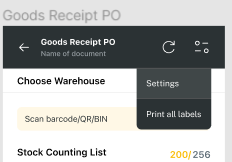
All scanned items will be printed with their respective serial/batch numbers.
Printing Options
Serial/Batch Number Selection:
During label printing, all scanned serial/batch numbers for the chosen item are available.
Option to print a specific number or choose to print all numbers.
Choosing Template, Printer, and Tray:
After selecting serial/batch numbers, a pop-up prompts the user to choose a template, printer, and tray for label printing.
Activating Print for Item:
If print activation is required in the document, perform the necessary action (e.g., swipe) before pressing the print button.
Special Cases
Serial/Batch Managed Items:
For items managed by serial or batch, users are redirected to a printing popup to choose the job.
If a predefined job is used, it automates the printing process for all selected items.
Predefined Job for Scanners:
Scanners using predefined jobs may automate the printing process for selected items.